Not sure what to do with those markers and chalks? Wanna get more mileage out of them? Get a simple stamp (or complicated if you have a wild hair) and follow along!
I have two sets of chalk I like to use. The Pebbles on the left are soft and sparkly. The decorating chalks on the right are richly pigmented and both have a great palette of color. I also like to use Fantastix for coloring. Make up applicators and quality cotton swabs would work. I like the Fantastix because I can sand the tips, making the stick usable with another color. I chose and Christmas-y red and green marker to use with my simple holly berries stamp. Both of the markers are Whispers brand. I've had them for several years (thank you, ebay) and they still work wonderfully. I also have Marvy and Tombow brand markers that work well for this technique. It is important to use markers with a brush tip. I usually stamp on white cardstock, nothing special.
Color the stamp with the brush tip of the marker. Here I'm working with green.
Here is my stamp all colored with red and green. These markers are good about staying wet on the stamp but you can give your stamp a good, hot huff of air for good luck.
And here is the result on paper.
Dab the applicator on desirable chalk color.
Apply just like a crayon. Experiment with varying pressure for shading.
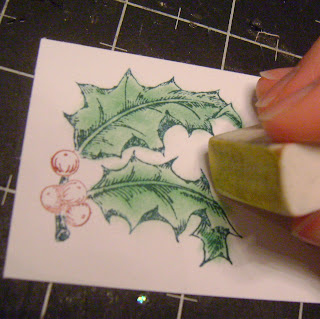
Just for example's sake, I applied even color to the top leaf and played with shading on the bottom leaf. I also have stray chalk outside the lines! No biggie.
I used my chalk away eraser to clean up the image. You can also use the eraser to vary shading.
I cut my stamped image into a simple square and matted on a Spellbinder embossed piece. The bling is Stephanie brand bling. I used CarlaBaz's card for inspiration. Her can visit her blog here. The ribbon is random from my stash and the papers are My Mind's Eye. Green cardstock is AC.
I topped my stamped image with glossy accents. The berries have a touch of red stickles.
I love stick pins and brads!
Another example of stamping with markers and coloring with chalk. I did this one for Mother's Day 2009.
I did this one last year.
This one is stamped with Stazon brown and colored with chalk. This card was inspired by BadSherry. I hope she checks in and shares her blog address! She is SOOOOOO talented! You can see more about how I did this card here.


4 comments:
Thanks for the tutorial...I always love your work!
GREAT tutorial, Alissa! I have not used chalks. I should do a tutorial using Distress Inks and a waterbrush...you have inspired me! LOVE your cards~ They have great dimension and texture. :)
Alissa, spent more time tonight here on your blog. Keep the sharing up lady as I am learning more than you know.
I've always been fond of coloring with pencils and using chalks/pastels. But in scrapping and card making I've had hard time transitioning. Your work here will lend itself to my benifit. Thanks so much~
Amazing tips! Thank you so much for sharing your tutorial. I'm now excited to change my shopping list from alcohol inks to chalks and good markers.
Post a Comment