Pages

Sunday, September 30, 2012

Altered Paper Roll *Heartfelt Creations*

A couple of weeks ago, I made this oversized spool from a toilet paper roll for Heartfelt Creations.

I NEEDED a purple one. And I NEEDED to play with the latest release Delicate Asters.
All of the papers and stamps are from the Delicate Asters Collection. 
The fun trim is from Hobby Lobby.

How pretty is this Aster? I'm kind of a dummy when it comes to making flowers but this came together so easily! I used Concord Grape Distress Ink to stamp the Asters. After I layered the pieces, I used Stickles for sparkle. I love the leaf stamp/die that comes with this collection as well!


I used the Script Aster Background on the one inch circle. The pink flower was made from the Posy Patch flowers and dies.

Thanks for stopping by!

Wednesday, September 26, 2012

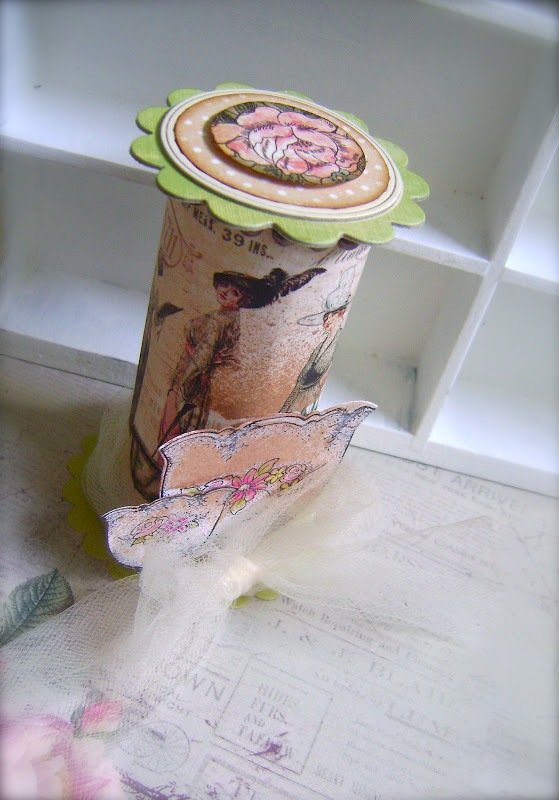
Tea for Two *Heartfelt Creations*

A fun decor piece. I was inspired by Pojjo's project. The paper is from Ladies Diary by Graphic 45.

The top is a layer of K and Company chipboard, punched circles, and a rose punched from G45 patterned paper.


Thanks for stopping by!
Check out the Heartfelt Creations Blog for more inspiration.


SUPPLIES:
HCPC 3472 China Fragments PreCut Set
204800 Nested Tea Cups Shapeabilities
354810 Classic Scallop Circle Large
SF03602 Prismacolor Pencil Set 120 pc.

OTHER:
Toilet paper roll. Paper from Ladies Diary by Graphic 45. Kaisercraft pearls. Cream colored tulle. Circle punches. Glimmer Mist. Chipboard from Wild Saffron by K and Company.

INSTRUCTIONS:
Wrap a toilet paper roll with G45 paper. Die cut a base with Classic Scallop Circle Large and attach the roll. Glue the K and Company chipboard to the top of the roll and layer with punched circles and finally the rose paper. Wrap the bottom of the spool with cream colored tulle and tie a bow. Stamp the China Fragments on white cardstock. Color and die cut. Layer the tea cups to the roll and finish with a spray of Glimmer Mist.

Wednesday, September 19, 2012

Joyful Christmas Greetings *Heartfelt Creations*

I have another CAS card for you today. This style is great if you lots and lots of holiday cards for friends and family. You could skip the stitching and make it even easier or try using a good pen and drawing a border. All of the stamps and paper are by Heartfelt Creations. 

I used this sketch for inspiration. The lines reminded of the wood grain in the Festive Yuletide Doorway stamp by Heartfelt Creations. Come over to Stuck On U Sketches and play with us!

I love using two colors of Distress Inks. Here, I used Vintage Photo and a bit of Barn Door on the sentiment.

A bit of Diamond Stickles (my favorite) here and there.

How about this sparkly trim?! I love holiday ribbon.

Thanks for stopping by!
Be sure to visit the Heartfelt Creations Blog 
today for more inspiration!


SUPPLIES:
HCPC 3489 Festive Yuletide Doorway PreCut Set
HCPC 3493 Yuletide Sentiments PreCut Set
HCDP1 225 Frosty Blanket Paper Collection
393386 Labels 4

OTHER:
Diamond Stickles. Vintage Photo and Barn Door Distress Inks. Archival Black Ink. Ribbon. Kraft cardstock. Sewing machine.

INSTRUCTIONS:
Cut, ink, and mat a background paper from the Frosty Blanket Collection to fit a 6x6 inch top fold card.  Machine stitch the edges. Cut, ink, and mat a 3 inch piece to fit across the middle. Machine stitch the edges and adhere to the background. Use Archival Black Ink to stamp the Festive Yuletide Doorway on Kraft cardstock. Trim the image, ink and mat to a solid color. Machine stitch the edges. Adhere to the card front. Attach a trim and bow. Stamp the sentiment on white cardstock and die cut with Labels 4. Use the die as a template for inking with Vintage Photo and Barn Door. Attach with foam adhesive. Finish the card front with Diamond Stickles. Attach the card front to a 6x6 top fold card base.

Wednesday, September 12, 2012

Quick Recovery *Heartfelt Creations New Release*

We are pleased to introduce the Delicate Asters Collection. You are creative! Show your friends with this unique Aster collection. With beautiful elegant petals and Monarch butterflies, this set will represent you in a lively popping way. The typography makes speaking from your heart quick and easy. Our paper is a great value for those looking to get their money’s worth on materials. Since there are two different designs on the paper’s front and back, you get 24 different designs in one package. 
Now you have a variety of options when you get bored.

There are 6 new PreCut Stamp Sets, one 12x12 Paper Collection, and one beautiful new exclusive Spellbinders die designed for Heartfelt Creations. Leave a comment on the HC blog by September 18th and you will be eligible to win the entire release valued at $145.92. 

How beautiful are these colors?!! For this card, I was inspired by Anna's work.

This sentiment is stamped with Archival black ink. The edges are accented with Vintage Photo Distress Ink and topped with Diamond Stickles. The pearls are Kaisercraft.

This image is stamped on patterned paper from the Delicate Asters Collection. I used Prismacolor pencils to add color details.

I love how I can use the patterned paper to help me decide how to color the butterfly! 
Makes my life so much easier.

Thanks for stopping by!
Be sure to check the Heartfelt Creations Blog for more inspiration and your chance to win!

SUPPLIES:
HCPC 3497 Script Aster Background PreCut Set
HCPC 3499 Delicate Asters and Butterflies PreCut Set
HCDP1 226 Delicate Asters Collection
HCD 725 Decorative Metal Fixtures Die
393386 Labels 4
SF03602 Prismacolor Pencil Set 120 pc.

OTHER:
Vintage Photo Distress Ink. Diamond Stickles. Kaisercraft Pearls. Tulle.

INSTRUCTIONS:
Stamp the butterfly and sentiment on white paper. Stamp the collage on patterned paper. Color the collage and butterfly. Cut out all the pieces. Distress and ink the edges of the collage piece. Ink and Stickle the sentiment. Add pearls. Add Stickles to the butterfly. Cut a purple background paper to fit a 6x6 card and mat. Die cut a green piece with Labels 4 and trim the top. Die cut the Decorative Metal Fixture from white cardstock. Cut a wide, narrow trim from the striped paper. Layer the Labels 4, wide strip, collage piece, and use foam adhesive for the sentiment. Adhere the decorative corner and butterfly. Stuff a bit of tulle in the corners of the sentiment. Attach the card front to a 6x6 inch top fold card base.
Wednesday, September 5, 2012

Thank You *Heartfelt Creations* and *Stuck On U Sketches*

Papers from Classic Edition by Heartfelt Creations.

I followed this sketch over at Stuck On U Sketches for today's card. 
Come and join us for a chance to win!

Sentiment stamp from Heartfelt Expressions by Heartfelt Creations. I stamped the sentiment on white cardstock, die cut with a Labels 4 die, and inked with two colors of Distress Inks.

Be sure to check out the blog and the new website for more inspiration!

SUPPLIES:
HCPC 3474 Heartfelt Expressions PreCut Set
393386 Labels 4
HCDP1 224 Classic Edition Paper Collection

OTHER: Brown rick rack. Old Paper and Vintage Photo Distress Inks. Fiskars border punch. Tape for masking. American Crafts- card base.

INSTRUCTIONS: Cut a piece of double sided paper and a mat from the Classic Edition Paper Collection to fit a 4.25 x 5.5 inch top fold card. From the patterned paper, cut a 1.5 inch strip from the short side, reverse the small strip and adhere the two pieces to the mat. You should have one 1.5 pattern at the top and a larger pattern piece at the bottom of the card. Stamp and die cut the sentiment. I used tape to mask the part of the sentiment I didn't need. Use the same Labels 4 die to mask the edges of the stamped die cut and ink. I used two colors of Distress ink- Old Paper and Vintage Photo. Set aside. Use a border punch to cut a trim and adhere to the card. Attach a piece of rick rack. Use foam adhesive to add the stamped die cut. Adhere the card front to a 4.25 x 5.5 inch top fold card base.

Friday, August 31, 2012

ScrapThat! September Kit Reveal and Blog Hop

Welcome to the ScrapThat! September Kit Reveal and Blog Hop!!

We are super excited to bring you our AMAZING September Kit featuring the yummy
"Graphic 45 A Ladies Diary Collection"

This kit is chock full of gorgeous goodies that is sure to knock your socks off!!!! Just for starters think ribbon, ZVA Bling, Dusty Attic and Prima and ZVA Flowers and much much more.
So without further ado....introducing our
September Kit Reveal
"Victorian Dream"
Main Kit $39.99
NOTE: The Main Kit cost for non-members is $44.99
1 ea A Ladies Diary
1 ea Afternoon Tea
1 ea Delicate Details
1 ea Garden Stroll
1 ea Focal Point
1 ea Picture Perfect
1 ea Lasting Impression
1 ea Moment in Time
1 ea Bazzille Card Stock, Butterscotch
1 ea Bazzille Card Stock, Earth
1 ea Bazzille Card Stock, Leaf
1 ea Graphic45, A Ladies' Diary, Alphabet Stickers
1 ea ZVA, Self-Adhesive Embellishment
1 ea Dusty Attic - Chipboard, Wire Dress Form
1 ea Tim Holtz, Pen Nib
2 ea Paper and Present (Etsy), 4" Doilies
2 ea Wild Orchid, Large Skeleton Leaves, Bronze
2 ea Wild Orchid Crafts, Long Leaves
3 ea Petaloo, FloraDoodles Flowers, Cream
6 ea Feathers
6 ea IAMROSES, Flowers
1 Pkg ZVA, Self-Adhesive Embellishment
1 Length Sinamay 3" Ribbon
1 Length Organza w/Satin Edge (non-wired) ribbon
1 Length Tim Holtz, Film Strip Ribbon
1 Length Red Heart, Super Bulky Wool, Pheasant
1 Length Tulle, white
1 Length Metallic Stretch Cord, Gold


Embellishment Add-On $14.99
NOTE: The Embellishment Add-On cost for non-members is $17.99
1 Pkg Prima, Allegra Biscuit flowers
1 Pkg Prima, Say it in Crystals
1 Pkg Petaloo, Chipboard Deco Frames
1 ea Organza String Pouch, Bronze
1 Length Wild Orchid, Pearl String


Flower Add-On $12.99
NOTE: The Paper Add-On cost for non-members is $17.99
1 Pkg Zva, Flower with Leaves
1 Pkg Prima, Manette Flowers
1 Pkg Prima, Avon Rose Printery Flower

Paper Add-On $9.99
NOTE: The Flower Add-On cost for non-members is $12.99
1 ea A Ladies Diary
1 ea Afternoon Tea
1 ea Delicate Details
1 ea Garden Stroll
1 ea Focal Point
1 ea Picture Perfect
1 ea Lasting Impression
1 ea Moment in Time
1 ea Bazzille Card Stock, Butterscotch
1 ea Bazzille Card Stock, Earth
1 ea Bazzille Card Stock, Leaf

 Two of my projects.


We are currently accepting new Kit Club Members.
For more information, complete the form on the link below:
We also have our September  Sketch Challenge Posted
Everyone is welcome to participate, all entries due by September 15th

My take on the sketch.
Our Blog Hop features 10 fantastic blogs from our Design Team
To qualify for this month's Prize you must complete the following:
* Visit each blog listed on the hop to see what each Designer has created using this month's kit and sketch (comments are very much appreciated)
* Each Designer's blog hop post will feature a word, to make up a secret sentence, collect these words along the way and follow the directions provided in ScrapThat!'s forum when you are all finished.
* You must become a FOLLOWER of each blog along the way and LIKE us on our Facebook Page!
* Post the ScrapThat! Blinkie on your blog
* The last stop on our Blog Hop is our Forum, follow the link provided and complete the remainder of the Blog Hop Instructions
The Blog Hop ends September 2nd 12AM CST
Prize MUST be claimed within 3 days of the forum announcement which will also be made on the ScrapThat! Blog
If left unclaimed a NEW winner will be chosen ~
Please Note: for anything larger than an envelope, winner will be responsible for the cost of shipping.
Prizes won during the month will be mailed out the first week of the following month.
due to Customs clearance,  International mailings sometimes take 30-75 days to receive.

SECRET WORD IS:
45's

Next hop over to:
Should you lose your way, come back here for the Blog Hop sequence: