Pages

Showing posts with label cards. Show all posts

Monday, August 18, 2014

celebration

My homemade Surf's Up Kit for August. See those die cuts on the bottom- in the middle?

Ta-da! I've made this card before and I finally made three more over the weekend. Such cute and simple. Next weekend, I'm gonna do some pull-out-all-the-stops cards.

The die cut flowers are from Walk In My Garden for Cricut. The sentiment is from Hot Off the Press.

It's so nice to have a little pile of sweet cards to give away!

Thanks for stopping by!

CHALLENGES:


Saturday, January 4, 2014

so very beautiful

Boy, oh boy, I love Northwoods stamps. I received this beauty for Christmas 2012, colored it during the summer, and just put it on a card last week. The papers are from This and That by Echo Park.

I used Prismacolor pencils to color the image. I didn't have a Spellbinders die to fit so I drew a border with a Micron pen.

Tuesday, September 24, 2013

Fancy Flowers *Heartfelt Creations Alumni Hop*

Welcome to my post for the

Heartfelt Creations Alumni Blog Hop!

Be sure to leave a comment on all the participating blogs. One participant will be chosen to receive a $25 Gift Certificate. Be sure the check the Winner Announcement on Sat, Sept 28. If you win, send an email to Emma Lou and write "winner of the September Alumni Hop" in the subject line.

Hop ends on Friday, Sept 27 at midnight.


This adorable bouquet is from Doorway Trimmings. I colored the image with Prismacolor pencils, cut with Spellbinders, and accented with Distress Ink. The papers are from Journey by Authentique. The decorative edge punch is EK Success.

Thanks for stopping by!

Alissa Wells- http://willrunforstamps.blogspot.com/--- YOU ARE HERE


Sunday, August 11, 2013

Card Set *Memorable Seasons*


The members over at Memorable Seasons are having a great time issuing the challenges this month!  Come on over and play with us for your chance to win a prize!


This set of cards is for Sally's Color Challenge, which includes grey, light blue, navy blue, and fuschia. I started with Crate Paper's "Random" and added in my July and August kits... and everything else! LOL I had so much fun mixing and matching my supplies.

I was inspired by Iwona's sketch HERE.

The ribbon and the cork arrow came from my August kit. The grey and blue polka dot paper came from my July kit. It's Travel Girl by October Afternoon. The fuschia paper is from Random by Crate Paper. The photo corner is from Everyday Moments by Teresa Collins. The navy blue cardstock and tag are from DCWV. The navy blue polka dotted piece is from Weekend Market by BoBunny. The MEMO label is Colorbok and the sentiment is from Simple Stories 24/7.

The yellow piece is also from Random. The bingo card and blue denim flag are from Simple Stories- 24/7 and Summer Fresh. The bling is from Fine and Dandy by MME. The alpha stickers are from What a Wonderful Day by Fancy Pants. The pink flower was made with Heartfelt Creations stamps and dies- Posy Patch Collection.

The travel log paper is from Travel Girl by October Afternoon. The polka dot paper is from Random. The brown tag is from So Sophie by MME. The notebook sticker is by Colorbok. The green label sticker is from Witch Hazel by October Afternoon. The sentiment sticker is from Uncommon by Authentique. I sprayed the corrugated butterfly with Starfish Glimmer Mist. The bling is from Fine and Dandy by MME.

The polka dotted cardstock and ribbon were in my August kit. The cloud punch is by Fiskars. The cloud sticker is from Summer Fresh by Simple Stories. The chevron lookin' paper is from Travel Girl and the alphas are from What a Wonderful Day.

*whew*

Thanks for stopping by!

Tuesday, June 25, 2013

you inspire me *heartfelt creations*

Welcome to my post for the Heartfelt Creations Alumni Blog Hop!

Be sure to leave a comment on all the participating blogs. One participant will be chosen to receive a $25 Gift Certificate. Be sure the check the Winner Announcement on Sat, June 29. If you win, send an email to Emma Lou and write "winner of the June Alumni Hop" in the subject line.

Hop ends on Friday, June 28 at midnight.


The lighthouse stamp is Sand and Sea PreCut Set by Heartfelt Creations. The sentiment is from Inspire Me Sentiments PreCut Set. The papers are by My Mind's Eye. I used Prismacolor pencils for coloring and die cut with Spellbinder dies.


Emilia van den Heuvel - http://few-favourite-things.blogspot.nl

Thanks for stopping by!

Saturday, March 30, 2013

Celebrate with style

I hate spring.

Allergies. Frustration.

Boo.

But then there's this card....
I followed one of Claudia's layouts. I even used the same paper from Miss Caroline by MME. The stamp is by PSX. I colored it with Prismacolor pencils and blended with the marker. The surrounding flowers are all made from Heartfelt Creations stamps and dies. The sentiment is by Hero Arts.

CHALLENGES:
Simon Says- Anything Goes


--------------------

Earlier this week, I participated in the Heartfelt Creations Design Team Alumni blog hop. I couldn't get over feeling like my card wasn't finished.


UPDATE
There we go! I added filler leaves and a sentiment. Finished!

Thanks for stopping by!


Tuesday, March 26, 2013

Thoughts of You


Welcome to my post for the Heartfelt Creations Alumni Blog Hop!

Be sure to leave a comment on all the participating blogs. One participant will be chosen to receive a $25 Gift Certificate. Be sure the check the Winner Announcement on Sat, Mar 30. If you win, send an email to Emma Lou and write "winner of the January Alumni Hop" in the subject line.

Hop ends on Friday, Mar 29th at midnight.

I was inspired by Claudia's style for this card. Papers are from This and That by Echo Park.

 These flowers were made with Posy Patch stamps and dies and Tattered Blossoms stamps and dies.

This stamp is retired and is called Thoughts of You. I colored the image with Prismacolor pencils and blended with the Blender Marker. After cutting with Spellbinder dies, I inked the edges with Broken China Distress Ink.


Alissa Well http://willrunforstamps.blogspot.com/--- YOU ARE HERE

Thanks for stopping by!

CHALLENGES:
Simon Says Stamp- Easter/Spring

Tuesday, March 12, 2013

Spring Butterfly

It's a crafty sort of spring break! I'm still in my pajamas, sipping coffee, and poking at the computer. I MUST work out today and I MUST cook good food. No more Easy Mac.

Today's card was inspired by a sketch at Artful Delight and by Gabrielle's "Congrats" card.

Papers are from The Bright Side of Life by The ScrapCake. The Kraft die cuts are from Decorative Butterfly by Spellbinders for Heartfelt Creations. The doily cut is from Floral Doily Motif by Spellbinders. The butterfly is a sticker by K and Company. The pink pleated trim is by Maya Road and the bead trim is from my stash.

CHALLENGES:
Artful Delight- Card Sketch

Thanks for stopping by!

Monday, March 4, 2013

May Your Day

I needed something quick and fabulous so I CASEd this card by Andrea Ewen.

Papers are from Charlotte's Dream by Kaisercraft. The decorative border punch is by Fiskars. The sentiment stamp is by Darcie's. I cut the sentiment with a Spellbinders die and accented with Tim Holtz Distress Ink. The trims and button are from my stash.

CHALLENGES:

Thanks for stopping by!

Tuesday, February 26, 2013

on your special day *Heartfelt Creations*

Welcome to my post for the Heartfelt Creations Alumni Blog Hop!

Be sure to leave a comment on all the participating blogs. One participant will be chosen to receive a $25 Gift Certificate. Be sure the check the Winner Announcement on Sat, Mar 2. If you win, send an email to Emma Lou and write "winner of the January Alumni Hop" in the subject line.

Hop ends on Friday, Mar 1st at midnight.


Y'all, I totally took this photo at night with my little point and shoot Sony Cybershot. Not bad, eh? The card details... I used papers from Delicate Asters. The sentiment is from Classic Message.

Thanks for stopping by!


Alissa Wells www.willrunforstamps.blogspot.com/--- You are here

Monday, February 4, 2013

Duck Says Hi

I had a great and wonderful crafty weekend! I got THREE cards done (that's a lot for me) and knocked out a couple of challenges. I also squeezed in a workout that I missed on Thursday, played a couple rounds of Trouble, checked off my cleaning checklist, grocery shopped, and cooked food for the week. I only snapped at my poor child once and it was totally excusable.

He ran me out of bed early on Saturday morning. 
Something about being hungry?

For this card, I followed the February Card Sketch by Artful Delight. The paper is from Fair Weather by Authentique. The stamp is by Penny Black and I colored it in with Prismacolor pencils. No special blending techniques. The ribbon was RAK'd to me by Jenifer.

CHALLENGES:
Artful Delight- February Card Sketch
Whimsy Stamps- Fancy Edges

Thanks for stopping by!


Sunday, January 13, 2013

Serenity

I followed the January Challenge Sketch by Artful Delight. The background paper is from Meadowlark by My Mind's Eye. The tree is a digital stamp from McMahon Five Design. The sentiment is by Raindrop Echo Designs for Whimsy Stamps.

For "Splash of Color," I used a bit of green twine, cardstock, and Old Paper Distress Ink.

CHALLENGES:

Wednesday, October 31, 2012

warm and cozy *Heartfelt Creations* and *SOUS*

I love this lamp post! Papers are from Wassail by Basic Grey.

The sentiment is from the Yuletide Sentiments PreCut Set. The metal pin is by Tim Holtz and the ribbon is from Michael's.

I used Versamark ink and P.K. Glitz embossing powder with the Holiday Haven flourish stamp.

I was inspired by fellow DT member Marisa for coloring this light.

I used Loew-Cornell pencils to color this lamp. I still love the raw look of these pencils!

Thanks for stopping by!

Be sure to visit the 
for more inspiration.


SUPPLIES:
HCPC 3491 Holiday Haven PreCut Set
HCPC 3488 Decorative Metal Fixtures PreCut Set
HCPC 3493 Yuletide Sentiments PreCut Set
HCD 725 Decorative Metal Fixtures Die
354803 Scallop Oval Large
HCD 716 Layered Elegant Swirl Die

OTHER:
Wassail paper by Basic Grey. Versamark embossing ink. Honeycomb embossing powder by P.K. Glitz. Loew-Cornell pencils. Ribbon. Tim Holtz metal pin. Micron pen. Gold bling. Vintage Photo Distress Ink by Tim Holtz. Archival black ink. Foam adhesive.

INSTRUCTIONS:
Cut, ink, and mat a background paper from the Wassail collection to fit a 4.5 by 6 inch card. Die cut two Layered Elegant Swirls from white paper in the Wassail collection. Adhere to card front. Cut a strip of brown cardstock to fit through the middle of the card and layer with ribbon. Stamp and heat emboss the Holiday Haven flourish stamp on tan paper from the Wassail collection. Attach to card front. Die cut and edge emboss with the Scallop Oval. Attach to card front and layer with a bow. Stamp, color, and die the Decorative Metal Fixtures. Attach with foam adhesive. Stamp and trim the Yuletide Sentiment. Insert the metal pin through the bow and finish with the sentiment. Attach the card front to the 4.5 by 6 inch card base.

Wednesday, October 24, 2012

My Wish for You *Heartfelt Creations*


SUPPLIES:
HCPC 3498 Delicate Aster Vase PreCut Set
HCPC 3497 Script Aster Background PreCut Set
HCDP1 226 Delicate Asters Paper Collection
SF03602 Prismacolor Pencil 120 pc.

OTHER:
Archival black ink. Versamagic black chalk ink. Vintage Photo Distress Ink. Ribbon. Twine. Charm.

INSTRUCTIONS:
Stamp, color, die cut, and mat the Delicate Aster Vase. Set aside. Stamp, trim, ink, and mat the sentiment. Set aside. Cut, ink, and mat a purple background paper for a 6 x 6 card. Cut, ink, and mat a 2.75 inch piece for the center. Adhere to background. Attach a length of white ribbon. Layer on the sentiment and vase. Finish with a bow and use twine to attach a charm. Glue the card front to a white, 6x6 inch base.

Wednesday, October 17, 2012

Happy Birthday *Heartfelt Creations*

I do love the flowers and pink in this new Vintage Floret collection by Heartfelt Creations! All papers, stamps, and dies are from Heartfelt Creations.

I was inspired by this sketch for today's card. Come and join our challenge at SOUS!

I stamped the flowers with Versamark ink and heat embossed with glittery powder.

Love the typography in this set!

Thanks for stopping by!

Be sure to visit the Heartfelt Creations Blog for more inspiration!


SUPPLIES:
HCPC 3504 Bold Vintage Floret Background PreCut Set
HCPC 3502 Mini Vintage Floret PreCut Set
HCD 727 Vintage Floret Die
HCD 710 Decorative Oval Window Die
354802 Classic Oval Large
HCDP1 227 Vintage Floret Paper Collection

OTHER:
Archival black ink. Vintage Photo and Victorian Velvet Distress Inks by Tim Holtz. Versamark ink. Gliter embossing powder and heat gun. Ribbon. White American Crafts cardstock for the base.

INSTRUCTIONS:
Cut, ink, and mat the green background paper to fit a 6x6 inch card. Cut, ink the edges, and mat the pink patterned paper to fit through the center. Attach a stretch of ribbon across the center. Die cut the Decorative Oval Window from blue cardstock and adhere to the center. With Archival black ink: stamp the Bold Vintage Floret Background, die cut and ink the edges. Set aside. Stamp again with Versamark and heat emboss with glitter. Layer the heat embossed flowers on the oval piece. Stamp the leaves in green and die cut. Arrange and glue with the flowers. Attach the oval piece over the window. Stamp, trim, ink, and mat the sentiment. Add a decorative corner and attach the piece to the card front. Tie and glue on a bow. Attach the card front to a 6x6 inch base.

Wednesday, October 10, 2012

Vintage Flower Pot *Heartfelt Creations*

The Vintage Floret release is a beautiful collection of ancient luxury. This month’s paper release is similar to the wallpaper of a quaint Parisian café. The textured flower stamps add a quiet delicacy to every project. The typography is a delightful combination of botanical growth and grandmother’s old typewriter stored away in the attic.
There are 5 new PreCut Stamp Sets, one 12x12 Paper Collection, and one beautiful new exclusive Spellbinders die designed for Heartfelt Creations. Leave a comment on the HC blog by 
October 16th and you will be eligible to 
win the entire release 
valued at $134.93. 


I love flower pots! I only wish my yard was full of flower pots. But, until I grow a green thumb, I will have to be satisfied with coloring them. 

I colored this image with Prismacolor pencils and blended with the Prismacolor Colorless Blender. The corners of the image piece is stamped with Tattered Collage. I used Versamark ink and topped with brown shimmer chalk by Pebbles.

I used Archival black ink to stamp these flowers. After die cutting, I sprayed them with Creme de Rouge Glimmer mist and inked the edges with Victorian Velvet Distress Ink.


Thanks for stopping by!


SUPPLIES:
HCPC 3502 Mini Vintage Floret PreCut Set
HCPC 3500 Open Vintage Floret PreCut Set
HCPC 3503 Vintage Floret PreCut Set
HCPC 3471 Tattered Collage PreCut Set
HCD 727 Vintage Floret Die
HCDP1 227 Vintage Foret Paper Collection
SF03602 Prismacolor Pencil Set 120 pc.

OTHER:
Inks: Archival black; Vintage Photo, Victorian Velvet and Forest Moss Distress Inks by Tim Holtz; Versamark. Creme de Rouge Glimmer Mist. Pebbles Shimmer Chalk. Fiskars border punch. EK Success corner punch. White lace. Bling and brads. White ribbon. Sewing machine. Prismacolor blender pencil. White cardstock for base.

INSTRUCTIONS:
Stamp, trim, and color the Vintage Floret image. Ink the image and mat. Set aside. Stamp and die cut the flowers and leaves. Glimmer Mist the flowers, let dry and then ink the edges with Victorian Velvet. Layer and fix with brads/gems. Set aside. Cut, ink the edges, and mat a pink background paper to fit a 6x6 inch square card. Set aside. Cut, ink, and mat a complementary piece to fit the center of the card. Machine stitch the background, center piece, and stamped piece. Layer a punched border to the bottom of the center piece. Adhere to the card front. Attach the lace to the center piece and top with the stamped piece. Arrange and glue the flowers to the corner. Punch a corner piece and attach to top right corner of stamped piece. Add a bow and top the flowers with gems. Adhere the card front to a 6x6 inch card base.

Sunday, September 30, 2012

Altered Paper Roll *Heartfelt Creations*

A couple of weeks ago, I made this oversized spool from a toilet paper roll for Heartfelt Creations.

I NEEDED a purple one. And I NEEDED to play with the latest release Delicate Asters.
All of the papers and stamps are from the Delicate Asters Collection. 
The fun trim is from Hobby Lobby.

How pretty is this Aster? I'm kind of a dummy when it comes to making flowers but this came together so easily! I used Concord Grape Distress Ink to stamp the Asters. After I layered the pieces, I used Stickles for sparkle. I love the leaf stamp/die that comes with this collection as well!


I used the Script Aster Background on the one inch circle. The pink flower was made from the Posy Patch flowers and dies.

Thanks for stopping by!

Wednesday, September 26, 2012

Tea for Two *Heartfelt Creations*

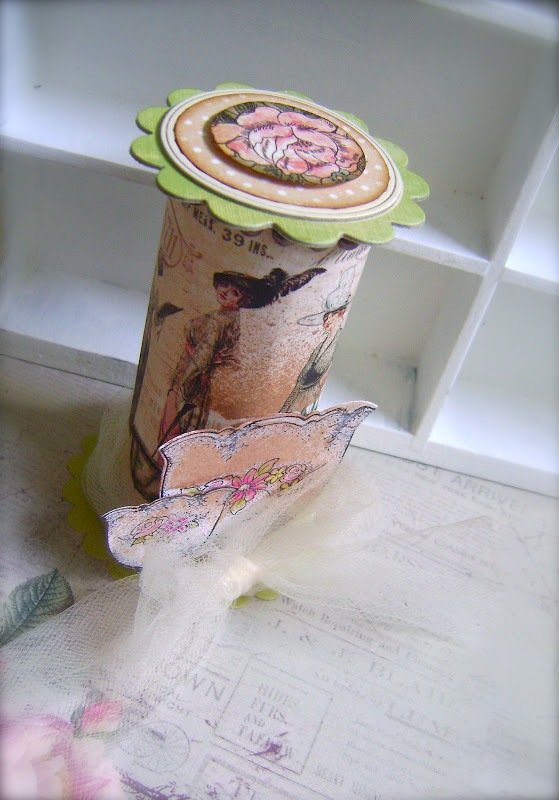
A fun decor piece. I was inspired by Pojjo's project. The paper is from Ladies Diary by Graphic 45.

The top is a layer of K and Company chipboard, punched circles, and a rose punched from G45 patterned paper.


Thanks for stopping by!
Check out the Heartfelt Creations Blog for more inspiration.


SUPPLIES:
HCPC 3472 China Fragments PreCut Set
204800 Nested Tea Cups Shapeabilities
354810 Classic Scallop Circle Large
SF03602 Prismacolor Pencil Set 120 pc.

OTHER:
Toilet paper roll. Paper from Ladies Diary by Graphic 45. Kaisercraft pearls. Cream colored tulle. Circle punches. Glimmer Mist. Chipboard from Wild Saffron by K and Company.

INSTRUCTIONS:
Wrap a toilet paper roll with G45 paper. Die cut a base with Classic Scallop Circle Large and attach the roll. Glue the K and Company chipboard to the top of the roll and layer with punched circles and finally the rose paper. Wrap the bottom of the spool with cream colored tulle and tie a bow. Stamp the China Fragments on white cardstock. Color and die cut. Layer the tea cups to the roll and finish with a spray of Glimmer Mist.

Wednesday, September 19, 2012

Joyful Christmas Greetings *Heartfelt Creations*

I have another CAS card for you today. This style is great if you lots and lots of holiday cards for friends and family. You could skip the stitching and make it even easier or try using a good pen and drawing a border. All of the stamps and paper are by Heartfelt Creations. 

I used this sketch for inspiration. The lines reminded of the wood grain in the Festive Yuletide Doorway stamp by Heartfelt Creations. Come over to Stuck On U Sketches and play with us!

I love using two colors of Distress Inks. Here, I used Vintage Photo and a bit of Barn Door on the sentiment.

A bit of Diamond Stickles (my favorite) here and there.

How about this sparkly trim?! I love holiday ribbon.

Thanks for stopping by!
Be sure to visit the Heartfelt Creations Blog 
today for more inspiration!


SUPPLIES:
HCPC 3489 Festive Yuletide Doorway PreCut Set
HCPC 3493 Yuletide Sentiments PreCut Set
HCDP1 225 Frosty Blanket Paper Collection
393386 Labels 4

OTHER:
Diamond Stickles. Vintage Photo and Barn Door Distress Inks. Archival Black Ink. Ribbon. Kraft cardstock. Sewing machine.

INSTRUCTIONS:
Cut, ink, and mat a background paper from the Frosty Blanket Collection to fit a 6x6 inch top fold card.  Machine stitch the edges. Cut, ink, and mat a 3 inch piece to fit across the middle. Machine stitch the edges and adhere to the background. Use Archival Black Ink to stamp the Festive Yuletide Doorway on Kraft cardstock. Trim the image, ink and mat to a solid color. Machine stitch the edges. Adhere to the card front. Attach a trim and bow. Stamp the sentiment on white cardstock and die cut with Labels 4. Use the die as a template for inking with Vintage Photo and Barn Door. Attach with foam adhesive. Finish the card front with Diamond Stickles. Attach the card front to a 6x6 top fold card base.