Pages

Showing posts with label holidays. Show all posts

Wednesday, September 19, 2012

Joyful Christmas Greetings *Heartfelt Creations*

I have another CAS card for you today. This style is great if you lots and lots of holiday cards for friends and family. You could skip the stitching and make it even easier or try using a good pen and drawing a border. All of the stamps and paper are by Heartfelt Creations. 

I used this sketch for inspiration. The lines reminded of the wood grain in the Festive Yuletide Doorway stamp by Heartfelt Creations. Come over to Stuck On U Sketches and play with us!

I love using two colors of Distress Inks. Here, I used Vintage Photo and a bit of Barn Door on the sentiment.

A bit of Diamond Stickles (my favorite) here and there.

How about this sparkly trim?! I love holiday ribbon.

Thanks for stopping by!
Be sure to visit the Heartfelt Creations Blog 
today for more inspiration!


SUPPLIES:
HCPC 3489 Festive Yuletide Doorway PreCut Set
HCPC 3493 Yuletide Sentiments PreCut Set
HCDP1 225 Frosty Blanket Paper Collection
393386 Labels 4

OTHER:
Diamond Stickles. Vintage Photo and Barn Door Distress Inks. Archival Black Ink. Ribbon. Kraft cardstock. Sewing machine.

INSTRUCTIONS:
Cut, ink, and mat a background paper from the Frosty Blanket Collection to fit a 6x6 inch top fold card.  Machine stitch the edges. Cut, ink, and mat a 3 inch piece to fit across the middle. Machine stitch the edges and adhere to the background. Use Archival Black Ink to stamp the Festive Yuletide Doorway on Kraft cardstock. Trim the image, ink and mat to a solid color. Machine stitch the edges. Adhere to the card front. Attach a trim and bow. Stamp the sentiment on white cardstock and die cut with Labels 4. Use the die as a template for inking with Vintage Photo and Barn Door. Attach with foam adhesive. Finish the card front with Diamond Stickles. Attach the card front to a 6x6 top fold card base.

Wednesday, August 29, 2012

Holiday Season *Heartfelt Creations*


I love summer but I'm ready for a change of seasons!
 I struggle with reds so this was a nice challenge for me. Papers are from Alpine Frost by SEI.

I stamped and cut this sentiment with a Labels 4 die. I used a combination of brown and red Distress Inks to accent the edges.

I Googled "red bird" to find inspiration for coloring these birds. I'm always amazed at the variety of species in the animal kingdom!

My poinsettia didn't quite turn out the way I wanted. Guess I'll have to try again!!! :) Again, I used a variety of Distress Inks to color the edges. I think I used Old Paper, Vintage Photo and Tea Dye. I absolutely LOVE the green tint in Old Paper.

I love the huge Decorative Lace Die. It's fun to cut up and use among multiple projects.

Be sure to stop by the Heartfelt Creations Blog for some serious eye candy!

SUPPLIES:
HCPC 3493 Yuletide Sentiments PreCut Set
HCPC 3490 Holiday Mail PreCut Set
HCPC 3480 Brookside Manor PreCut Set
HCD 723 Garden Romance Die
HCD 713 Decorative Lace Die
393386 Labels 4 Die
376183 Labels 2 Die
Prismacolor Pencil Set 120 pc.

OTHER:
Paper from Alpine Frost be SEI. Distress Inks. Ribbon. White cardstock base by American Crafts.

INSTRUCTIONS:
Cut a background pattern paper and mat to fit a 6x6 inch card. Choose a complementary piece to fit through the center of the card and mat. Cut a piece cardstock with the Decorative Lace Die. Fit to the front. Add two strips of ribbon and set aside. Stamp, color, and die cut the Holiday Mail image. Stamp, color, and die cut the Brookside Manor bird. Stamp and die cut the sentiment. Use the dies as a template for inking the edges with Distress Inks. Use a variety of colors for effect. Use the same Labels 2 Die to cut a mat for the Holiday Mail image. Lay the die on a piece of cardstock, use a pencil to trace the outside edge and cut with scissors. Adhere the Holiday Mail image to the mat and fix to the card front. Layer on the sentiment- I used foam adhesive. Finish with a bow and the Brookside Manor bird. Attach the card front to a 6x6 top fold card base.

Sunday, April 29, 2012

I Love You

This card is going to be for my very own mommy! She loves pink, blue, green, flowers, and 
stuff that sparkles. Think I covered all that?

I've fallen in love with using 6x6 papers on my cards over the last month or so, thus a buying addiction. However, I always sighed and rolled my eyes when I flipped through this MME Miss Caroline paper pad and saw that background paper, with the dark wood and flowers. I just didn't like it. Then, I saw this card by Claudia. So THAT'S how it's done! As usual, she is brilliant with layering. I always love how she mixes colors for matting. It certainly takes the fuss out of matching everything. Well, let me just admit it: most of this card is fashioned after hers. At least, it's for someone really special!

I know I just posted my farewell to Whimsy Stamps but I'll never be tired of their digis. This one is by Crissy Armstrong. I colored her with Prismacolor pencils and blended with OMS. I used Distress Ink on the edges, blue and green.

The flowers are a blend of Prima and Recollections. The little metal piece I found on eBay. I used my Cricut to cut a perfect paper oval and filled it with a sentiment from Hot Off the Press, 
topped with Glossy Accents.

Have you made something for your mom? Leave a direct link in the comments and I will check it out!

Monday, April 23, 2012

Christmas *Whimsy Stamps*

Followed a sketch by Mojo Monday. The stamp is by Raindrop Echo Designs for Whimsy Stamps. Papers are from Christmas Emporium by Graphic 45.

Added a wee bit of color to this image with Loew-Cornell pencils. 
Inked the edges and topped with Stickles.

Who else is working on Christmas cards in April?

Wednesday, April 18, 2012

Mom *Crafter's Companion Challenge Blog Guest Designer*


Hello, Everyone!  I am delighted to present my second Guest Designer project for you today!  I made a Mother's Day card for the current challenge at Crafter's Companion Challenge Blog.  Please play with us for your chance to win the fabulous prize package!

How cute is this bear?!! This is Popcorn the Bear from Thanks A Bunch stamp set. I followed a sketch from Hanna and Friends 132. The papers are from A Walk In the Park by Echo Park.

The stamp package came with a lovely print that helped me navigate coloring. I used Prismacolor pencils and blended with odorless mineral spirits. This is a rather large image so I always fussy cut this bear and attach with foam adhesive.


Thanks so much for stopping by today!  I've really enjoyed being the guest designer for April.  Don't forget to enter to win the S.W.A.L.K stamp set giveaway this week.  And if you haven't already entered our Mother's Day challenge you need to get scrapping!!  lol

SUPPLIES

Stamp(s) and Ink: Thanks A Bunch from Crafter’s Companion. Archival black. Colorbox. 
Paper: A Walk In the Park by Echo Park.
Tools: Spellbinders. Martha Stewart. Paper Studio.
Coloring Medium: Prismacolor pencils with Odorless Mineral Spirits.
Embellishments: Buttons. Authentique.

Wednesday, April 4, 2012

Skating Snowman *Whimsy Stamps Challenge*

Your challenge from Whimsy Stamps this week is to use ribbon and add a sentiment.

Come over and play for your chance to win digital stamps!

It's already April so I decided it's time to start on my holiday cards.
I followed a sketch by Viva La Verve. Papers are from Eskimo Kisses by Basic Grey. The trim is Making Memories.

To get the decorative top note shape, I cut my largest Spellbinder shape in half.


This cute little guy is by Crissy Armstrong for Whimsy Stamps
I colored him with Prismacolor pencils and blended with OMS.

Thanks for stopping by!

Wednesday, March 7, 2012

Easter Bunny *Whimsy Stamps*

Your challenge at Whimsy Stamps this week is to forgo a sentiment!
I know, right?!! I just got into putting a sentiment on the front of all my cards.

Play along with us for your chance to win free digital stamps!

I followed Claudia's design to make this card. I love how she uses flowers. It takes all my energy to put flowers on my projects! I used papers by Anna Griffin.

This adorable image is a digi by Kathy (StampArt Designs) for Whimsy Stamps. I colored her with Prismacolor pencils and blended with OMS. I fussy the image and foam dotted to a series a mats, cut from Storybook/Cricut Expression.

I wish I made these. I'm just not into making flowers yet. So, I let my friends and my sister do all the work for me. The large, yellow carnation was made by my sister Vivian 
and the smaller roses were made by Stephanie. The pink trim is American Crafts.

A fun view. Oh, and check out the Stickles on the mat edge. 
I love to use Distress Ink first and then add Stickles!

And one more time.

I really appreciate this card because I did it on a MONDAY night. I work full time and crafting on a weeknight is extremely rare. I did get lazy and didn't add any green filler to my flowers, 
but I'm okay with that.

Thanks for looking!

CHALLENGES:
Clearly I Stamp- Anything Goes
Hotshot Craft- Ribbon

Tuesday, December 20, 2011

Christmas Magnetic Tray *flying unicorn*

I made this for a recent issue of Enchanting Creations. The papers are from I Believe by Riddersholm, available at Flying Unicorn.

The mini roses are available at Flying Unicorn. All the other flowers were handmade by my friend Stephanie. Everything is topped with Glimmer Mist, also available at Flying Unicorn.

The sentiment stamp is by Northwoods. The Santa brad is Imaginisce and the chipboard stickers are from The Paper Studio, a Hobby Lobby brand. I used crackle paint on the edges of my photo mats. Flying Unicorn has every color of crackle paint!

More of these fabulous roses! LOVE them!

I used small magnets to post the pictures. I can change them anytime!

Check out my video and watch me create this project from start to finish!

Sunday, December 18, 2011

the magic of christmas *flying unicorn*

I made this for a recent issue of Enchanting Creations. I followed a sketch by Mojo Monday.

This adorable bear is from Whimsy Stamps. I colored him with Prismacolor pencils and then accented with stickles. The circle is also topped with stickles and the scalloped piece is accented with crackle paint, available at Flying Unicorn.

This beautiful ribbon is from Michael's. Check out my tutorial below for how to make a bow!

The sentiment stamp is by Northwoods. I used Versamark and chalk to create a lovely, subtle pattern for this card. Check out the second video below.

Bow Management

Versamark with Chalk

Saturday, December 17, 2011

Whimsy Inspires Challenge *Whimsy Stamps*

You still have time to play! Hop over to the Challenge Blog for your chance to win!

My Card.
Followed a sketch by Jeanette. Papers are from Melissa Frances, available at Flying Unicorn.


This digital elf is from Whimsy Stamps. I colored him with Prismacolor pencils and blended with burnishing techniques.

This fun charm is by Making Memories.

This sentiment is also a digital stamp from Whimsy Stamps.

Thursday, December 15, 2011

Santa Tag *Flying Unicorn*

We had a Christmas party over at Flying Unicorn the other night and this tag was part of the guessing game. The CT members had to make a project using this vintage Santa. Players had to guess which CT member created which project.

The papers are from Christmas Emporium by Graphic 45, available at Flying Unicorn. I used crackle paint on the edges of all the papers. You can find a great selection of crackle paint the store!

I'm not really into the craze of making flowers but I can make this one little rose with my 6 petal punch. I learned how to make this rose from a tutorial by Gabrielle.

Sunday, December 11, 2011

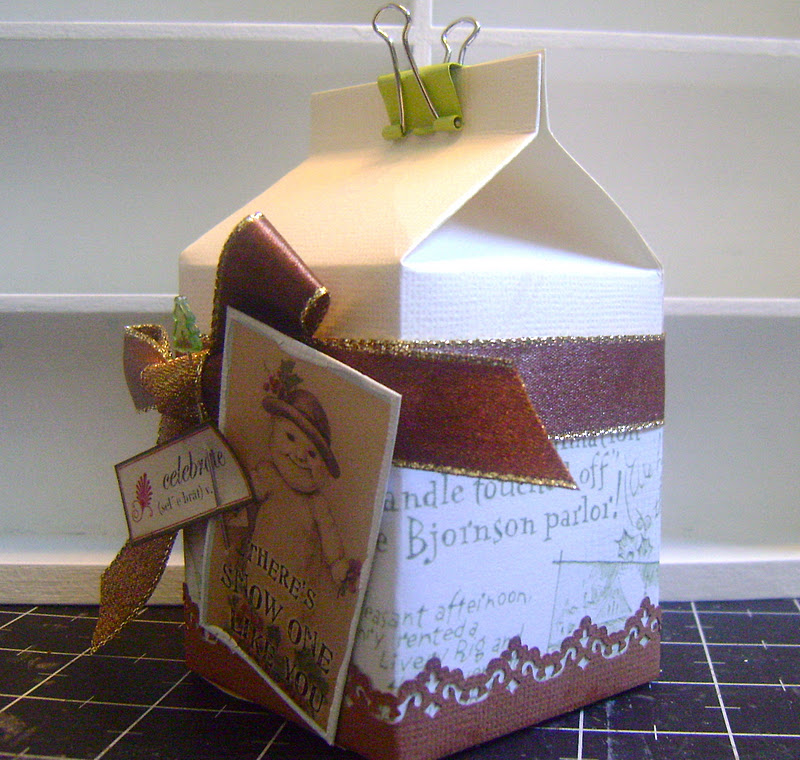
Milk Carton Treat Box *flying unicorn*

Make a milk carton treat box and enter your creation for a chance to win a prize. 
Go to Flying Unicorn to learn more.


The flower is by Stephanie. The paper is by Melissa Frances, available at Flying Unicorn.


The ephemera is by Crafty Secrets, accented with crackle paint. Choose from a huge variety of crackle paint at Flying Unicorn!


You can also stamp your box before you fold it and glue it together.

Saturday, December 10, 2011

Whimsy Stamps Challenge Blog- Patterns and Pearls

You still have time to play and win!

CHALLENGE: Pattern paper and pearls.

Spent a lot of time on this one! Papers by MME. Followed Cardabilities Sketch #4. Lots of layers here! My Spellbinder dies and Cuttlebug got a good workout.

This adorable bear is by Crissy for Whimsy Stamps. I colored him with Prismacolor pencils and blended with OMS.

Some flowers and filler.

More flowers. The little bow is actually just glossy accented to the top of the gold button. I'm lazy! That pretty red flower was handmade by my sister Vivian.

My little row of pearls and my favorite corner punch.

Thanks for stopping by!