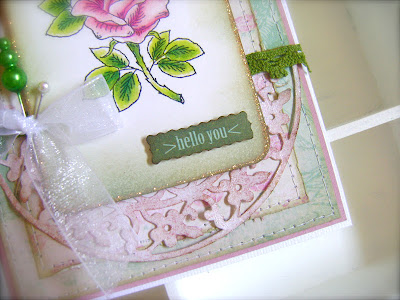
The second card I made for Heartfelt Creations.
This one is my favorite. I love shabby chic colors!
I want to give a shout out to Iwona. I had been looking at her "Thanks a Bunch" card
when I started on this rose. I really liked her green ink accents.
I followed Card Sketch Pattern 158. The papers are from Beautiful Dreamer by Glitz Design.
This gorgeous stamp is Katie Rose by Heartfelt Creations. I colored the image with Prismacolor pencils and blended with OMS. I cut it with room to spare at the bottom, then inked with green and brown and finished with Stickles.
A random punched piece left over from a previous project. It was pink! Perfect.
The sentiment is a die cut from Random by Crate Paper. For the large posy die, I cut it from white cardstock, topped with Clear Rock Candy and sprayed with Glimmer Mist.
MORE DETAILS
SUPPLIES
STAMP(S) AND INK: Heartfelt Creations “Katy Rose” Unmounted. Archival black ink. Tim Holtz Distress Ink.
PAPER: Beautiful Dreamer by Glitz Design, DCWV, American Crafts
COLORING MEDIUM: Prismacolor pencils, OMS
TOOLS: HC Spellbinder Dies “Layered Scalloped Posy”. Sewing machine. Glossy Accents. EK Success.
EMBELLISHMENTS: Stickles. ribbon. stick pins. Maya Road. Crate Paper “Random.” TH Clear Rock Candy. Glimmer Mist. Lace trim.
SKETCH: Card Patterns Sketch 158.
INSTRUCTIONS
- Stamp the image with Archival ink. I like to use the textured side of Canson Bristol XL Recycled with Prismacolor pencils and OMS. Color the image. Cut to 2.75 x 4 inches, leaving some white space under the image. Ink the edges with distress ink. I used TH vintage photo and old paper (kinda green). Stickle the edges and set aside to dry.
- Use the larger die from the Layered Scalloped Posy set and cut from smooth, white cardstock. Use temporary adhesive to hold the die cut on nonstick splat mat. Brush on clear rock candy. Let air dry.
- Cut a 3.5x5 inch piece from the rose paper. Distress and ink the edges. Adhere to 4 3/16 x 5 11/16 from greenish paper. Mat to pink cardstock. Machine stitch the edges.
- If the die cut is not dry, finish with a heat gun. Spray with pink glimmer mist and wipe away excess. Heat some more to dry. Adhere to card.
- Use Glossy Accents to attach lace trim. Use foam dots to attach stamped piece. Tie a bow from white ribbon and attach with glossy accents. TIP: Set a hammer on top to secure the bond. Do not move the hammer for at least ten minutes.
- Use foam dots to attach the “hello you” die cut sentiment.
- I had a tiny leftover, border punched piece from a previous project. It was pink. So, I inked the edges attached to the top of the card, kinda like a whimsical banner.
- Finish with a couple of stick pins.
- CARD BASE: Cut a 9x6 inch piece of thick, white cardstock. I like textured CS for card bases. Score at 4.5. Attach the card front to the base.
Thanks for stopping by!


3 comments:
So very super cute. I love the tutorial so much!
I have saved it
Such a lovely card! I love the subtle distressing, stitching and glittery accents! Thank you for the shout out :)
Pure gorgeosity!
Post a Comment