Pages

Showing posts with label gifts. Show all posts

Wednesday, August 22, 2012

Milk Carton Treat Box *Heartfelt Creations*


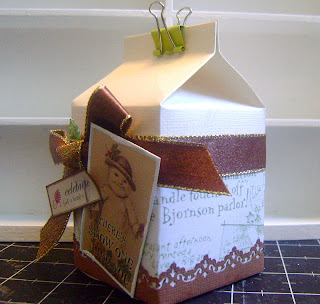
Aren't the colors in this paper collection DIVINE! I love the whole stack! This is a milk carton treat box, made entirely from HC cardstock. It's perfect for Holiday treats.

I made this video last winter.

SUPPLIES:
HCDP1 225 Frosty Blanket Paper Collection
HCPC 3493 Yuletide Sentiments PreCut Set
HCD 725 Decorative Metal Fixtures Die

OTHER: Trimmer, bone folder, button, twine, binder clip, ribbon.

INSTRUCTIONS:
Choose a 7x11 piece of cardstock for the base and score at 2", 5" and 6 1/2" on the short side of the cardstockTurn the cardstock 90 degrees and score at 2 1/2", 5", 7 1/2" and 10" on the long side of the cardstock. Position the cardstock with the long side closest to you. Now cut on vertical scores lines closest to you ( 2 1/2", 5", 7 1/2" and 10") up to the first horizontal score lines. Cut part of the 1" scored strip on the left hand side, leaving only the 3" piece to create a glue tab for the sides of the box. At the top of the box, cut the third panel from the left of the 1/2" x 2 1/2" rectangles off. This will be the spout. On the remaining three 1/2" x 2 1/2" panels, use a bone folder and trimmer track/scoring board to add a score down the middle of each panel. Use the ruler and bone folder to add diagonal score lines to the box as shown in the video. Use a bone folder to pre-fold all score lines, including the diagonal ones. Add glue to your glue tab. Adhere the glue tab inside to the opposite wall to form the box. Fold the bottom of the box and secure with glue to close the box. Add glue to the back half of the 1/2" panels at the top to hold the milk carton closed. Choose a decorate paper for the sides of the box. Cut to fit, ink and mat. Adhere to all four sides. Stamp, cut and ink the edges of the sentiment. Die cut the Decorative Metal Fixture. Fix the sentiment inside the Fixture and adhere to box. Attach a binder clip to the top of the box and add a bow. Finish with a button and twine.

Thursday, July 5, 2012

recipe album *Scrap That! Summer In My Garden July Kit*

Last month, I needed a gift for my childhood BFF and my ScrapThat! kit totally saved the day. This month, I needed a gift for my cousin who recently got hitched
 and, once again, ScrapThat! totally saved the day!

This kit "Summer In My Garden" features Organic by FabScraps. Ding Ding Ding! Recipe album!

"Organic", the pearls, and white rose are from the kit. I also handmade some flowers from the papers in the kit. The teeny purple roses and neutral colored flowers are from my stash. The bird is by K and Company. The letter stickers are from Mellow by Basic Grey. The large eyelet is by WRMK. The brown ribbon is American Crafts.

This butterfly is by K and Company.

I used the Ingvild Bolme chalk ink from the kit to give this chipboard some color. 
Accented with Wheatfields Glimmer Mist.

The closure.

The back. The tape is by Tim Holtz.

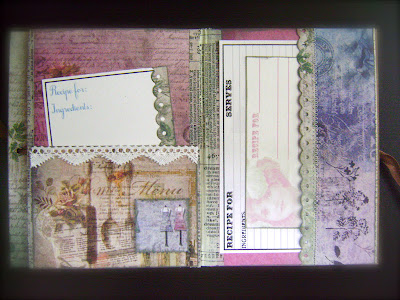
First glance at the inside. I thought she'd like to see a picture from her wedding in this album.

All of the recipe cards can be removed. The card on the right is in the kit.

The white lace is from the kit. I trimmed it for a different shape. The birds are by K and Company. The cloud punch shape is Fiskars.

Cut from a Cuttlebug die. Love all the pearls in the kit! They are by Melissa Frances. 
The decorative edge is Fiskars.

I found the recipe cards at Sweetly Scrapped.

"Apple of My Eye" is Stampin' Up. My cousin will be able to move the anchor and write her own notes about the recipes (like changes she makes). These extra little cards for her own notes are available with each recipe card in the album.


A stamped, romantic couple serving as the corner holder on this page.


Thanks for stopping by!

Sunday, December 11, 2011

Milk Carton Treat Box *flying unicorn*

Make a milk carton treat box and enter your creation for a chance to win a prize. 
Go to Flying Unicorn to learn more.


The flower is by Stephanie. The paper is by Melissa Frances, available at Flying Unicorn.


The ephemera is by Crafty Secrets, accented with crackle paint. Choose from a huge variety of crackle paint at Flying Unicorn!


You can also stamp your box before you fold it and glue it together.

Wednesday, November 30, 2011

Whimsy Challenge Blog *whimsy stamps*


Play along for your chance to win some stamps!

I save these kinds of boxes. The kind that open easily without a chainsaw.

And turn them into treat boxes! I put a couple of Ghirardeli chocolates in here for my son's teacher. The pattern paper is from Riddersholm, available at Flying Unicorn. The flower and bling were made by my friend Stephanie. The yellow sprigs are from a Martha Steward punch. The butterflies and clouds are from Fiskars punches.

The butterfly is a digital stamp by Natalie for Whimsy Stamps. I colored with Prismacolor pencils and topped with stickles.

Thursday, August 18, 2011

For Chance's Teacher

My little guy is going with me to Kindergarten this year! I teach music and his classroom teacher is a DOLL! So, I made a few things for her to show my appreciation.

Okay, I'm gonna admit that I will be just a little sad when I give this away! The box is a Smirnoff carrier. The papers are from Hittin' the Books by DCWV. It took a couple of hours to cover this in paper so I kept the embellishments simple. For adhesives: mod podge, scotch quick dry, glossy accents. I filled the pockets with die cuts, erasers (in the frappuccino bottle), pens, and pencils.

I lined every bit of this carrier. It was very strong, sturdy by the time I was done with it. I used Glossy Accents to attach the trim. I used mod podge to attach some of the paper but found that I preferred Scotch Quick Dry.


Decorative border is from MS punch.

The vintage cards were cut from paper in the DCWV stack.

HELPFUL HINTS:
I've altered frappuccino carriers before. This time, I measured my paper and then attached. In the awkward spots, I attached a piece of paper and used a pencil to trace lines where I needed to cut by hand. This worked out very well! To cut the hole for the handle: cut the paper fit, attach with repositionable adhesive, use the hole as a template to draw the oval on the back of the paper. Remove the paper, pick a spot to cut straight through to the hole (no one will notice in the end) and cut along the line. 

Clear as mud? If anything is ever unclear on my blog, you can check the box "show me a tutorial" at the end of the post :) This is especially great if you don't have time to leave a comment or blogger is being difficult.

More die cuts.
Some die cuts for her bulletin board. I used my 12x24 mat and cardstock so these cuts are rather large. I get my 12x24 Bazzill cardstock from Oh My Crafts! Also notice the 12x12 packs. They're a great price, great variety, and it's a LOT of paper! I've got one of the blue packs last year and I don't think I'm ever going to run out.

Volunteering die cuts are a great way to help your favorite teachers!