Pages

Showing posts with label colored pencils. Show all posts

Saturday, January 4, 2014

so very beautiful

Boy, oh boy, I love Northwoods stamps. I received this beauty for Christmas 2012, colored it during the summer, and just put it on a card last week. The papers are from This and That by Echo Park.

I used Prismacolor pencils to color the image. I didn't have a Spellbinders die to fit so I drew a border with a Micron pen.

Tuesday, September 24, 2013

Fancy Flowers *Heartfelt Creations Alumni Hop*

Welcome to my post for the

Heartfelt Creations Alumni Blog Hop!

Be sure to leave a comment on all the participating blogs. One participant will be chosen to receive a $25 Gift Certificate. Be sure the check the Winner Announcement on Sat, Sept 28. If you win, send an email to Emma Lou and write "winner of the September Alumni Hop" in the subject line.

Hop ends on Friday, Sept 27 at midnight.


This adorable bouquet is from Doorway Trimmings. I colored the image with Prismacolor pencils, cut with Spellbinders, and accented with Distress Ink. The papers are from Journey by Authentique. The decorative edge punch is EK Success.

Thanks for stopping by!

Alissa Wells- http://willrunforstamps.blogspot.com/--- YOU ARE HERE


Tuesday, June 25, 2013

you inspire me *heartfelt creations*

Welcome to my post for the Heartfelt Creations Alumni Blog Hop!

Be sure to leave a comment on all the participating blogs. One participant will be chosen to receive a $25 Gift Certificate. Be sure the check the Winner Announcement on Sat, June 29. If you win, send an email to Emma Lou and write "winner of the June Alumni Hop" in the subject line.

Hop ends on Friday, June 28 at midnight.


The lighthouse stamp is Sand and Sea PreCut Set by Heartfelt Creations. The sentiment is from Inspire Me Sentiments PreCut Set. The papers are by My Mind's Eye. I used Prismacolor pencils for coloring and die cut with Spellbinder dies.


Emilia van den Heuvel - http://few-favourite-things.blogspot.nl

Thanks for stopping by!

Monday, February 4, 2013

Duck Says Hi

I had a great and wonderful crafty weekend! I got THREE cards done (that's a lot for me) and knocked out a couple of challenges. I also squeezed in a workout that I missed on Thursday, played a couple rounds of Trouble, checked off my cleaning checklist, grocery shopped, and cooked food for the week. I only snapped at my poor child once and it was totally excusable.

He ran me out of bed early on Saturday morning. 
Something about being hungry?

For this card, I followed the February Card Sketch by Artful Delight. The paper is from Fair Weather by Authentique. The stamp is by Penny Black and I colored it in with Prismacolor pencils. No special blending techniques. The ribbon was RAK'd to me by Jenifer.

CHALLENGES:
Artful Delight- February Card Sketch
Whimsy Stamps- Fancy Edges

Thanks for stopping by!


Wednesday, August 29, 2012

Holiday Season *Heartfelt Creations*


I love summer but I'm ready for a change of seasons!
 I struggle with reds so this was a nice challenge for me. Papers are from Alpine Frost by SEI.

I stamped and cut this sentiment with a Labels 4 die. I used a combination of brown and red Distress Inks to accent the edges.

I Googled "red bird" to find inspiration for coloring these birds. I'm always amazed at the variety of species in the animal kingdom!

My poinsettia didn't quite turn out the way I wanted. Guess I'll have to try again!!! :) Again, I used a variety of Distress Inks to color the edges. I think I used Old Paper, Vintage Photo and Tea Dye. I absolutely LOVE the green tint in Old Paper.

I love the huge Decorative Lace Die. It's fun to cut up and use among multiple projects.

Be sure to stop by the Heartfelt Creations Blog for some serious eye candy!

SUPPLIES:
HCPC 3493 Yuletide Sentiments PreCut Set
HCPC 3490 Holiday Mail PreCut Set
HCPC 3480 Brookside Manor PreCut Set
HCD 723 Garden Romance Die
HCD 713 Decorative Lace Die
393386 Labels 4 Die
376183 Labels 2 Die
Prismacolor Pencil Set 120 pc.

OTHER:
Paper from Alpine Frost be SEI. Distress Inks. Ribbon. White cardstock base by American Crafts.

INSTRUCTIONS:
Cut a background pattern paper and mat to fit a 6x6 inch card. Choose a complementary piece to fit through the center of the card and mat. Cut a piece cardstock with the Decorative Lace Die. Fit to the front. Add two strips of ribbon and set aside. Stamp, color, and die cut the Holiday Mail image. Stamp, color, and die cut the Brookside Manor bird. Stamp and die cut the sentiment. Use the dies as a template for inking the edges with Distress Inks. Use a variety of colors for effect. Use the same Labels 2 Die to cut a mat for the Holiday Mail image. Lay the die on a piece of cardstock, use a pencil to trace the outside edge and cut with scissors. Adhere the Holiday Mail image to the mat and fix to the card front. Layer on the sentiment- I used foam adhesive. Finish with a bow and the Brookside Manor bird. Attach the card front to a 6x6 top fold card base.

Wednesday, August 15, 2012

Your Birthday *Heartfelt Creations*

At first, I thought this was done.
I couldn't stop staring at all that white space. Don't get me wrong. I love white space! But this is awkward.

So, I filled it in with some birds.
I was inspired by this sketch by Iwona. Papers are from Lost and Found Two "Sunshine" by My Mind's Eye.

I love the little banner trend! I colored everything with Prismacolor pencils.

Flowers are an assortment of daisies and little posies. Most were stamped on white cardstock and then Glimmer Misted.

These birds are from the Brookside Manor PreCut Set.


Thanks for stopping by!
Be sure to stop by the HC Blog for more inspiration from the Design Team.

SUPPLIES:


OTHER: Paper from My Mind's Eye Lost and Found. Vintage Photo, Old Paper, and Weathered Wood Distress Inks. Archival black ink. Cuttlebug. Wheatfields and Yellow Daisy Glimmer Mists. Fiskars border punch. The Paper Studio corner punch. Micron pen. Zva gold bling. Stampamajig.

INSTRUCTIONS:
Card is 6 x 6 inches. Cut a background piece to fit, ink the edges and mat to green and brown cardstocks. Use a Micron pen to draw a border. Cut a piece of stamping cardstock to fit the width of the card. Stamp the Pumpkin Harvest and Days Gone By images. Use a Stampamajig to position just right. Stamp another Pumpkin Harvest image on a separate piece of cardstock. Color all images. Ink the edges with Vintage Photo, Old Paper, and Weathered Wood Distress Inks. Fussy cut the second Pumpkin Harvest image and layer. Stamp, cut, and ink the sentiment. Layer on the colored images. Cut a decorative border and attach. Stamp, cut and Glimmer Mist an assortment of daisies and posies. Stamp and cut leaves. Layer with gold bling. Add a green corner piece. Stamp, color, cut and attach the birds. Attach to 6 inch folded card base.

Thursday, July 12, 2012

Just Thinking About You

Followed the July Sketch from Artful Delight. Cardstock from my stash; a variety of Kraft, yellow, and brown.


This flourish of butterflies is from Wings of Hope by Heartfelt Creations.

I colored the butterflies with Prismacolor pencils.

SUPPLIES:
HCPC 3479 Wings of Hope PreCut Set
HCPC 3474 Heartfelt Expressions PreCut Set


OTHER:
Kraft, yellow, and brown cardstock. Archival black ink. Wild Honey and Vintage Photo Distress Inks. Diamond Stickles. Prismacolor pencils. Twine. Micron black pen. Spellbinders Oval dies. Spellbinder Scalloped Oval dies. Bling.

Wednesday, July 11, 2012

Beautiful Day *Heartfelt Creations*

I gotta say: I never get tired of Heartfelt Creations stamps. They are just. so. beautiful. I used an assortment of Riddersholm, The Paper Studio, and Prima papers for this card.

This image is from the Broken Cinder Blocks set. I treated the brick wall like a timeless, shabby chic garden wall. I initially thought the bricks would be white but I ended up going with a cream color, like the paint is wearing away. At least, I tried.

These days, I like to color my image to match the papers. I lay the image on top of one of the papers and color away.

These are the Prismacolor pencils I used.

A Tattered Blossoms flower. I stamps the flowers on one of the pink papers from the Riddersholm collection. The center is textured with glitter.


SUPPLIES:
HCPC 3474 Heartfelt Expression PreCut Set
HPCP 3470 Broken Cinder Blocks PreCut Set
HPCP 3468 Tattered Blossoms PreCut Set
HCD 722 Tattered Blossoms Die
393386 Spellbinders Labels 4
Prismacolor Pencil Set 120 pc.
459222 Paper Blossoms Tool Kit


OTHER:
Papers from Prima, The Paper Studio, and Riddersholm. Fiskars border punch. Pebbles chalk. Ribbon. Archival black ink. Cuttlebug. Glitter. Vintage Photo Distress Ink. Odorless Mineral Spirits. Textured cardstock: browns, green, pink, and white.


INSTRUCTIONS:

1. Card is 6x6 inches. Choose four patterned papers.
2. Stamp the Broken Cinder Blocks image on cardstock and color to match patterned papers. Cut/emboss with largest, Labels 4 Spellbinders die.
3. Cut a piece from patterned paper for the background. Cut 2 wide pieces for the horizontal center. Cut 4" square for the center of the card. Ink the edges of all four patterned paper pieces. Mat to coordinating cardstock and adhere.
4. Attach ribbon. Use foam dots to attach the stamped image. Add a bow. Add a decorative punched trim to the bottom of the card.
5. Stamp and cut Heartfelt Expressions on white cardstock. Ink the edges, mat, and attach.
6. Stamp and cut Tattered Blossoms on pink paper. Die cut and shape into a tattered style flower. Finish flower with glitter in the center. Attach by the bow.


CARD BASE: Cut a 6x12 inch piece of thick, white cardstock. Score at 6 inches. Attach the card front to the base.

Wednesday, July 4, 2012

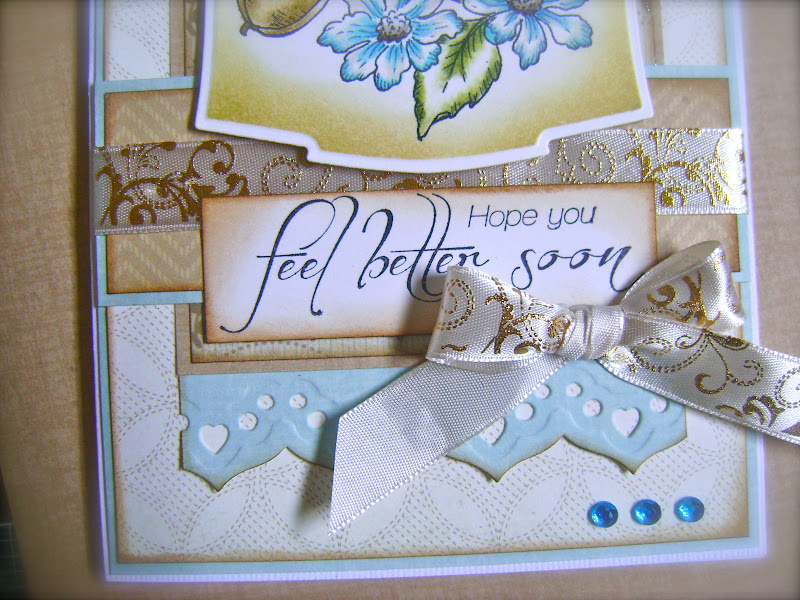
Hope You Feel Better Soon *Heartfelt Creations*

Followed a sketch from Random Acts of Creativity. Papers are from Linen Closet by DCWV. 
Ribbon is from Make It Christmas by Hobby Lobby. 

This stamp is from HCPC 3475 Special Delivery PreCut Set. I used Prismacolor pencils and OMS for coloring. I sponged Distress Inks on the edges, Old Paper and Antique Linen. I love using two colors!

I'm forever taking notice of different coloring styles and I've been really appreciating the white space lately. You can see what I've been looking at by monkadunka for Tiffany Doodles and another example from Stamping Down South

These are the pencils I used on the image.

The pretty decorative border is from 123830 Classic Petal Edgeabilities.


SUPPLIES:
HCPC 3475 Special Delivery PreCut Set
HCPC 3477 Bird Haven PreCut Set
376183 Labels 2
123830 Classic Petal Edgeabilities
Prismacolor Pencil Set 120 pc.

OTHER:
Archival black ink. Distress Inks- Antique Linen, Old Paper, Vintage Photo. Make It Christmas ribbon. Cuttlebug. Linen Closet by DCWV. Blue gems. Glossy Accents. Foam adhesive. Scotch Quick Dry Adhesive. American Crafts white cardstock.


INSTRUCTIONS:
1. Card is 5x7 inches. Choose three patterned papers. Cut, ink with Vintage Photo, and mat the background pattern to fit 5x7 card. Cut, ink, and mat the center piece. Cut, ink, and mat the horizontal border. Die cut the decorative border and cut width to fit under center piece. Layer and adhere all pieces. Set aside.
2. Use Archival blank ink to stamp Special Delivery and sentiment from Bird Haven on white cardstock. Color the image. Die cut with Labels 2 die. Use the die to stencil for inking the edges, first with Old Paper and then with Antique Linen. Set aside.
3. Cut the sentiment and ink the edges with Vintage Photo. Set aside.
4. Cut a length of ribbon and attach as shown. Use foam adhesive to attach Special Delivery piece. Add the sentiment and bow with Glossy Accents. Finish the card front with 3 gems on the bottom right.
5. Adhere card front to scored 5x7 card.

Wednesday, June 27, 2012

a note *Heartfelt Creations*


 Inspiration for this tag began with "Be Happy" by Mistra. I'm kinda clumsy when it comes to tags but Mistra's work was a great starting place! And LOOK no patterned papers! I use Kraft and plain, white cardstock with all that stamping.

I stamped this twice, colored, and fussy cut for dimension. The extra stamping is for that largest flower.

I love Prismacolor pencils. I didn't do any blending here. 
Used blue chalk and a black, Micron pen to accent.

See that subtle pink design on the Labels 4 die? That is stamped with Versamark 
and topped with pink chalk.

This Labels 4 die is ink with pink and brown Distress Inks. I used some circle punches to create a reinforced spot for twine.


SUPPLIES:
HCPC 3396 Bella Rose Lattice Background PreCut Set
HCPC 3477 Bird Haven PreCut Set
HCPC 3478 Twining Roses PreCut Set
HCPC 3475 Special Delivery PreCut Set
HCPC 3476 Mailbox Surprise PreCut Set
HCD 702 Decorative Butterfly Border Die
HCD 723 Garden Romance Die
393386 Spellbinders Labels 4
Prismacolor Pencil Set 120 pc.


OTHER:
Distress Ink. Archival black ink. Ingvild Bolme chalk ink. Versamark embossing ink.  Tim Holtz Crackle Paint. Pebbles chalk. Micron pen. Twine. Fiskars circle punch. Making Memories hole punch. Cuttlebug. Foam adhesive. Smooth, white cardstock. Kraft. Bristol paper. Fiskars Crimper.


INSTRUCTIONS:
1. With Archival black ink, stamp "A Note For You", the garden of flowers, and the flourish of flowers. Stamp the right flourish of flowers two times. Trim away "a note" from "for you." Ink the edges of the small sentiment with distress ink. Set aside.
2. Color and chalk the garden of flowers. Trim and outline with a Micron pen.
3. Color the flourish of flowers. Fussy cut. Trim away largest flower from second stamped image and layer on the first with foam adhesive.
4. Stamp the birdhouse with brown Distress Ink and die cut. Set aside.
5. Cut the largest Labels 4 die from smooth, white cardstock. Using the die as a template, ink the edges with pink and brown distress inks. Use Versamark ink to stamp a flourish of flowers, sponge on pink chalk for subtle effect. Punch a small circle from Kraft paper and adhere to far left. Punch a smaller hole through the middle of the Kraft piece. Accent with twine.
6. Cut at 4.25 x 3.25 inch piece of smooth, white cardstock. Stamp the Bella Rose Lattice with Ingvild Bolme chalk ink. Heat set. Ink the edges.
7. Use pink cardstock to die cut the border piece from Decorative Butterfly Border Die. Cut apart for two borders. Ink the edges.
8. Cut a 1 inch strip from Kraft cardstock. Run it through the Fiskars Crimper. Accent with Crackle Paint. Ink the edges. Layer one of the pink, decorative border on top.
9. Assemble all pieces as shown.

Wednesday, June 20, 2012

Special Day *Heartfelt Creations*

Be sure to check even more new inspiration at Heartfelt Creations!

Eventually, Claudia is gonna ban me from her blog... I'll be so sad. Once again, I followed one of her layouts. One of these days, I'll be a big girl and I will figure out how to work flowers all by myself! Until then... I used papers by K and Company.

This cluster is made from Posy Patch flowers and Bella Rose leafy swirl. I cut a variety of sizes in coordinating colors. The trim is from Stampin' Up.

The sentiment, fence and butterfly are all part of the new Garden Romance collection.

I only stamped and cut the Bella Rose leafy swirl thing once. 
I like to cut it apart and arrange the pieces to fit my project.

I just love this new stamp! I love romantic, shabby-chic-cottage-scenery stuff. I usually blend Prismacolor pencils with odorless mineral spirits, but I really liked the rustic look of the pencil here. So, I left the image unblended.

SUPPLIES:

OTHER:
K and Company. Archival black ink. Prismacolor pencils. Gems. Cuttlebug. Sewing machine. American Crafts. Bazzill. Stampin' Up. Gems.

INSTRUCTIONS:
1. Card is 6x6 inches. Choose three patterned papers.
2. Stamp the Brookside Manor image on cardstock and cut/emboss with largest, circular Spellbinders die. Color to match the patterned paper. Set aside.
3. Cut a 5.5x5.5" piece from patterned paper for the background. Cut a 2.75x5.25" piece for the vertical section. Cut 2.5" squares for the left and right sides of the card. Ink the edges of all four patterned paper pieces. Mat to coordinating cardstock and machine stitch.
4. Adhere the four patterned paper sections. Cut/emboss with largest, scalloped circle Spellbinders die. Attach to card front. Attach pink trim.. Use foam dots to attach the stamped image.
5. Stamp and cut Posy Patch Flowers on three colors of coordinating cardstock. Assemble in various sizes and attach to upper right of stamped image.
6. Stamp and cut Bella Rose Leaves on green paper. Cut the image apart and fill in floral arrangement. Finish flowers with gems.
7. Cut the fence piece from Garden Romance dies. Attach to lower left.
8. Stamp and cut a butterfly from green cardstock from Garden Romance dies. Attach to the fence.
9. Use Archival black ink to stamp "special day" on white cardstock. Cut a banner shape on the left end and layer on fence.

CARD BASE: Cut a 6x12 inch piece of thick, white cardstock. Score at 6 inches. Attach the card front to the base.

Wednesday, May 23, 2012

Thanks A Bunch *Heartfelt Creations*

Be sure to check more inspiration from the Heartfelt Creations Designers HERE.

I started with a sketch by Mojo Monday. Papers are from Marrakech by Basic Grey.

I colored this 787 G Wishing Well Unmounted Rubber Stamp with Prismacolor pencils and blended with odorless mineral spirits. I colored the roses orange because I was trying to match some Authentique paper. Didn't work out so I went with Marrakech... What do you think of the color scheme?

I stamped the sentiment with Archival ink and accented with Distress Ink.

SUPPLIES:
787 G Wishing Well Unmounted Rubber Stamp
HCPC 3474 Heartfelt Expression PreCut Set
354806 Standard Circle Large
354810 Classic Scallop Circle Large

OTHER: Marrekech by Basic Grey. Tim Holtz Distress Ink. Prima lace. Diamond Stickles. Prismacolor pencils. Odorless mineral spirits. Pebbles chalk. Sewing machine.


INSTRUCTIONS:
1. Card is 6x6 inches. Choose three patterned papers.
2. Stamp the wishing well image on cardstock and color to match the patterned paper. Ink the edges with Distress Ink and accent with Stickles. Set aside to dry.
3. Cut a 5.5x5.5" piece from patterned paper for the background. Cut a 2.75x5.25" piece for the bottom section. Cut 3.5x4" piece for the top layer. Ink the edges of all three patterned paper pieces. Mat to coordinating cardstock and machine stitch.
4. Adhere the three patterned paper sections. Attach lace. Use foam dots to attach the stamped image. 

5. Use Archival black ink to stamp "Thanks a bunch" on white cardstock. Die cut and mat. Attach with foam dots and Glossy Accents.
6. CARD BASE: Cut a 6x12 inch piece of thick, white cardstock. Score at 6 inches. Attach the card front to the base.

Friday, May 18, 2012

Flower Collage Card

I love this stamp. I bought it two years ago but have always had a time using it creatively. When I came across Tosha's "Nurture Yourself," I just had to try it!!! Papers are from The Bright Side of Life by The Scrap Cake.

TIP:
When I want distressing AND stitching, I always stitch first and then distress with my fingernails.
Ink
Stitch
Distress

The stamp is by Penny Black. I used Tim Holtz Distress inks to color the different panels. I used Prismacolor pencils to color the flowers. They are fussy cut and layered with foam dots.

Thanks for visiting!

Wednesday, May 16, 2012

You Inspire Me *Heartfelt Creations*

Boy, Oh, Boy I love the newest stamps from Heartfelt Creations this month! I didn't follow a sketch but I was inspired by TesaB. She has beautiful work on her blog! Papers are from Free Bird by Authentique.

I stamped the image with Archival black ink and colored with Prismacolor pencils, blended with OMS. I used a Spellbinder die to draw a template for cutting. The edges are inked and topped with Stickles.

The border punched piece is actually a negative from a postage stamp border punch by EK Success. I secured the bow with Glossy Accents. You can find a great assortment of Dewdrops in the Heartfelt Creations store.


SUPPLIES
HCPC 3469- Tattered Blossom Swirls PreCut Set
HCPC 3363 Inspire Me Sentiments PreCut Set
393386 Spellbinders Labels 4 Dies
311059 Island Blossom Dewdrops

OTHER: Free Bird by Authentique. Tim Holtz Distress Ink. Archival black ink. Prismacolor pencils. Odorless mineral spirits. Diamond Stickles. Sakura Gelly Roll Stardust pen. EK Success Postage Stamp border punch. Twine. Glossy Accents.

INSTRUCTIONS

1. Card is 4.5x6 inches. Choose three patterned papers.
2. Stamp the floral image on cardstock and color to match the patterned paper. Accent with Stickles and Stardust gel pen. Use the largest Labels 4 die as a template around the colored image. Use a pencil and trace around the outside of the die. Cut with scissors. Ink the edges with Distress Ink and accent with Stickles. Set aside to dry.
3. Cut a 2.5x5.5" piece from patterned paper for the top section of the card. Cut a 1.75x5.5" piece for the bottom section. Cut 1.5x4" piece for the vertical banner. Trim the end of this piece into a banner shape. Ink the edges of all three patterned paper pieces. Mat to coordinating cardstock.
4. Attach the banner piece to the left side of the card. Use foam dots to attach the stamped image. Use Archival black ink to stamp "You Inspire Me" at the bottom. Use a negative piece from the EK Success punch to fill in the horizontal seam. Tie a bow from twine and attach with Glossy Accents. Glue down three Dewdrops above the sentiment.
5. CARD BASE: Cut a 9x6 inch piece of this, white cardstock. Score at 4.5. Attach the card front to the base.

Thanks for stopping by!

Wednesday, May 9, 2012

Thank You *Heartfelt Creations- New Release*

You are not gonna believe what Heartfelt Creations has in store for you this month! If you're all about antiques and shabby chic, you're in for a real treat.

The beautiful papers are from Charlotte's Dream by Kaisercraft. I used a HC Tattered Background stamp behind the tear. The sentiment is from HC Heartfelt Expressions.

I stamped this adorable China Fragments teacup with Archival black ink, colored with Prismacolor pencils, and blended with odorless mineral spirits. I fussy cut the cup and accented with gems. The blue mat is stamped with Tattered Backgrounds.

I used Tattered Blossoms to make the flower accent.

1. Use a pink ink to stamp the smallest three flowers. Stamp the largest of the three two times. 
I did not use the largest two flowers for this piece.
2. Use the Tattered Blossoms dies to cut the flowers.
3. Spray each flower with Wheatfields Glimmer Mist.
4. Set aside one of the largest flowers. We'll call it A. While the other flowers are still wet, gently twist each petal. Dry all flowers, including A, with a heat gun. Once A is dry, use an embossing stylus to curl the tips under.
5. Flower A is the bottom layer. Layer and glue the center from largest to smallest. Gently pull up all petals for fluff and dimension.
6. Attach a button the center.
7. Tie bow from twine and attach the bow to the button with Glossy Accents.


SUPPLIES
HCPC 3474- Heartfelt Expressions Precut Set. 
HCPC 3472- China Fragments Precut Set. 
HCPC 3468- Tattered Blossoms Precut Set. 
HCPC 3473- Tattered Background Precut Set.
Tattered Blossoms Dies.

Other: Spellbinders Scalloped Circle dies. Archival ink. Tim Holtz Distress Ink. Prismacolor Pencils. Odorless mineral spirits. KaiserCraft paper. My Mind's Eye lace. Twine. Sewing machine. Zva bling. Embossing stylus. Glimmer Mist. Heat gun.